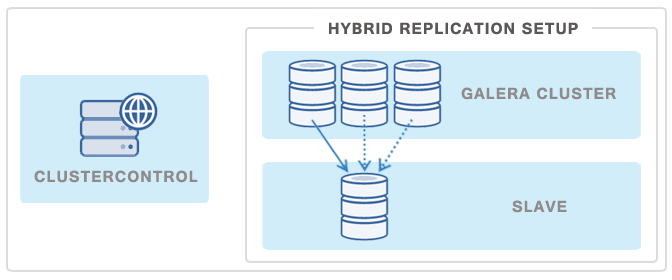
Combining Galera and asynchronous replication in the same MariaDB setup, aka Hybrid Replication, can be useful - e.g. as a live backup node in a remote datacenter or reporting/analytics server. We already blogged about this setup for Codership/Galera or Percona XtraDB Cluster users, but master failover did not work for MariaDB because of its different GTID approach. In this post, we will show you how to deploy an asynchronous replication slave to MariaDB Galera Cluster 10.x (with master failover!), using GTID with ClusterControl v1.2.10.

Preparing the Master
First and foremost, you must ensure that the master and slave nodes are running on MariaDB Galera 10.0.2 or later. MariaDB replication slave requires at least a master with GTID among the Galera nodes. However, we would recommend users to configure all the MariaDB Galera nodes as masters. GTID, which is automatically enabled in MariaDB, will be used to do master failover.
The following must be true for the masters:
- At least one master among the Galera nodes
- All masters must be configured with the same domain ID
- log_slave_updates must be enabled
- All masters’ MariaDB port is accessible by ClusterControl and slaves
- Must be running MariaDB version 10.0.2 or later
To configure a Galera node as master, change the MariaDB configuration file for that node as per below:
gtid_domain_id=<must be same across all mariadb servers participating in replication>
server_id=<must be unique>
binlog_format=ROW
log_slave_updates=1
log_bin=binlog
Preparing the Slave
For the slave, you would need a separate host or VM, with or without MariaDB installed. If you do not have MariaDB installed, and choose ClusterControl to install MariaDB on the slave, ClusterControl will perform the necessary actions to prepare the slave; configure root password (based on monitored_mysql_root_password), create slave user (based on repl_user, repl_password), configure MariaDB, start the server and finally start replication.
In short, we must perform the following actions beforehand:
- The slave node must be accessible using passwordless SSH from the ClusterControl server
- MariaDB port (default 3306) and netcat port 9999 on the slave are open for connections
- You must configure the following options in the ClusterControl configuration file for the respective cluster ID under /etc/cmon.cnf or /etc/cmon.d/cmon_<cluster ID>.cnf:
- repl_user=<the replication user>
- repl_password=<password for replication user>
- monitored_mysql_root_password=<the mysql root password of all nodes including slave>
- The slave configuration template file must be configured beforehand, and must have at least the following variables defined in the MariaDB configuration template:
- gtid_domain_id (the value must be the same across all nodes participating in the replication)
- server_id
- basedir
- datadir
To prepare the MariaDB configuration file for the slave, go to ClusterControl > Manage > Configurations > Template Configuration files > edit my.cnf.slave and add the following lines:
[mysqld]
bind-address=0.0.0.0
gtid_domain_id=1
log_bin=binlog
log_slave_updates=1
expire_logs_days=7
server_id=1001
binlog_format=ROW
slave_net_timeout=60
basedir=/usr
datadir=/var/lib/mysql
Attaching a Slave via ClusterControl
Let’s now add a MariaDB slave using ClusterControl. Our example cluster is running MariaDB 10.1.2 with ClusterControl v1.2.10. Our deployment will look like this:

1. Configure Galera nodes as master. Go to ClusterControl > Manage > Configurations, and click Edit/View on each configuration file and append the following lines under mysqld directive:
mariadb1:
gtid_domain_id=1
server_id=101
binlog_format=ROW
log_slave_updates=1
log_bin=binlog
expire_logs_days=7
mariadb2:
gtid_domain_id=1
server_id=102
binlog_format=ROW
log_slave_updates=1
log_bin=binlog
expire_logs_days=7
mariadb3:
gtid_domain_id=1
server_id=103
binlog_format=ROW
log_slave_updates=1
log_bin=binlog
expire_logs_days=7
2. Perform a rolling restart from ClusterControl > Manage > Upgrades > Rolling Restart. Optionally, you can restart one node at a time under ClusterControl > Nodes > select the corresponding node > Shutdown > Execute, and then start it again.
3. On the ClusterControl node, setup passwordless SSH to the slave node:
$ ssh-copy-id -i ~/.ssh/id_rsa 10.0.0.1284. Then, ensure the following lines exist in the corresponding cmon.cnf or cmon_<cluster ID>.cnf:
repl_user=slave
repl_password=slavepassword123
monitored_mysql_root_password=myr00tP4ssword
Restart CMON daemon to apply the changes:
$ service cmon restart5. Go to ClusterControl > Manage > Configurations > Create New Template or Edit/View existing template, and then add the following lines:
[mysqld]
bind-address=0.0.0.0
gtid_domain_id=1
log_bin=binlog
log_slave_updates=1
expire_logs_days=7
server_id=1001
binlog_format=ROW
slave_net_timeout=60
basedir=/usr
datadir=/var/lib/mysql
6. Now, we are ready to add the slave. Go to ClusterControl > Cluster Actions > Add Replication Slave. Choose a master and the configuration file as per the example below:

Click on Proceed. A job will be triggered and you can monitor the progress at ClusterControl > Logs > Jobs. You should notice that ClusterControl will use non-GTID replication in the Jobs details:

You can simply ignore it as we will setup our MariaDB GTID replication manually later. Once the add job is completed, you should see the master and slave nodes in the grids:

At this point, the slave is replicating from the designated master using the old way (using binlog file/position).
Replication using MariaDB GTID
Ensure the slave catches up with the master host, the lag value should be 0. Then, stop the slave on slave1:
MariaDB> STOP SLAVE;Verify the slave status and ensure Slave_IO_Running and Slave_SQL_Running return No. Retrieve the latest values of Master_Log_File and Read_Master_Log_Pos:
MariaDB> SHOW SLAVE STATUS\G
*************************** 1. row ***************************
               Slave_IO_State:
                  Master_Host: 10.0.0.131
                  Master_User: slave
                  Master_Port: 3306
                Connect_Retry: 60
              Master_Log_File: binlog.000022
          Read_Master_Log_Pos: 55111710
               Relay_Log_File: ip-10-0-0-128-relay-bin.000002
                Relay_Log_Pos: 28699373
        Relay_Master_Log_File: binlog.000022
             Slave_IO_Running: No
            Slave_SQL_Running: No
Then on the master (mariadb1) run the following statement to retrieve the GTID:
MariaDB> SELECT binlog_gtid_pos('binlog.000022',55111710);
+-------------------------------------------+
| binlog_gtid_pos('binlog.000022',55111710) |
+-------------------------------------------+
| 1-103-613991                              |
+-------------------------------------------+
The result from the function call is the current GTID, which corresponds to the binary file position on the master.
Set the GTID slave position on the slave node. Run the following statement on slave1:
MariaDB> STOP SLAVE;
MariaDB> SET GLOBAL gtid_slave_pos = '1-103-613991';
MariaDB> CHANGE MASTER TO master_use_gtid=slave_pos;
MariaDB> START SLAVE;
The slave will start catching up with the master using GTID as you can verify with SHOW SLAVE STATUS command:
        ...
        Seconds_Behind_Master: 384
Master_SSL_Verify_Server_Cert: No
                Last_IO_Errno: 0
                Last_IO_Error:
               Last_SQL_Errno: 0
               Last_SQL_Error:
  Replicate_Ignore_Server_Ids:
             Master_Server_Id: 101
               Master_SSL_Crl:
           Master_SSL_Crlpath:
                   Using_Gtid: Slave_Pos
                  Gtid_IO_Pos: 1-103-626963
Master Failover and Recovery
ClusterControl doesn’t support MariaDB slave failover with GTID via ClusterControl UI in the current version (v1.2.10), this will be supported in v1.2.11. So, if you are using 1.2.10 or earlier, failover has to be done manually whenever the designated master fails. Initially, when you added a replication slave via ClusterControl, it only added the slave user on the designated master (mariadb1). To ensure failover works, we have to explicitly add the slave user on mariadb2 and mariadb3.
Run following command on mariadb2 or mariadb3 once. It should replicate to all Galera nodes:
MariaDB> GRANT REPLICATION SLAVE ON *.* TO slave@'10.0.0.128' IDENTIFIED BY 'slavepassword123';
MariaDB> FLUSH PRIVILEGES;
If mariadb1 fails, to switch to another master, you just need to run following statement on slave1:
MariaDB> STOP SLAVE;
MariaDB> CHANGE MASTER TO MASTER_HOST='10.0.0.132';
MariaDB> START SLAVE;
The slave will resume from the last Gtid_IO_Pos. Check the slave status to verify everything is working:
MariaDB [(none)]> show slave status\G
*************************** 1. row ***************************
               Slave_IO_State: Waiting for master to send event
                  Master_Host: 10.0.0.132
                  Master_User: slave
                  Master_Port: 3306
                Connect_Retry: 60
              Master_Log_File: binlog.000020
          Read_Master_Log_Pos: 140875476
               Relay_Log_File: ip-10-0-0-128-relay-bin.000002
                Relay_Log_Pos: 1897915
        Relay_Master_Log_File: binlog.000020
             Slave_IO_Running: Yes
            Slave_SQL_Running: Yes
              Replicate_Do_DB:
          Replicate_Ignore_DB:
           Replicate_Do_Table:
       Replicate_Ignore_Table:
      Replicate_Wild_Do_Table:
  Replicate_Wild_Ignore_Table:
                   Last_Errno: 0
                   Last_Error:
                 Skip_Counter: 0
          Exec_Master_Log_Pos: 130199239
              Relay_Log_Space: 12574457
              Until_Condition: None
               Until_Log_File:
                Until_Log_Pos: 0
           Master_SSL_Allowed: No
           Master_SSL_CA_File:
           Master_SSL_CA_Path:
              Master_SSL_Cert:
            Master_SSL_Cipher:
               Master_SSL_Key:
        Seconds_Behind_Master: 133
Master_SSL_Verify_Server_Cert: No
                Last_IO_Errno: 0
                Last_IO_Error:
               Last_SQL_Errno: 0
               Last_SQL_Error:
  Replicate_Ignore_Server_Ids:
             Master_Server_Id: 102
               Master_SSL_Crl:
           Master_SSL_Crlpath:
                   Using_Gtid: Slave_Pos
                  Gtid_IO_Pos: 1-103-675356
That’s it! Please give it a try and let us know how these instructions worked for you.
Blog category: